This chapter describes the basic configuration required for the FaxPress Enterprise Redundant to be able to send and receive faxes. This chapter also describes the configuration required for automatic inbound fax routing and integration with your digital line and PBX system.
For help configuring additional FaxPress Enterprise Redundant Server Properties after the Enterprise Redundant is operational see Setting the FaxPress Enterprise & Enterprise Redundant Server Properties.
Before using the FaxPress Enterprise Redundant to send and receive faxes, you’ll need to configure, at minimum, the FaxPress Enterprise Redundant’s:
| ■ | Line Settings |
| ■ | Dialing Properties |
| ■ | Email settings |
| ■ | Routing Type settings, to integrate the Enterprise Redundant with your PBX system and digital line. See Automatic Routing and PBX System Integration. |
The Enterprise Redundant’s Email settings should be configured with the name of your SMTP or Exchange server. This allows your users to access their email address books for addressing faxes, enables them to send fax messages to email recipients as well as fax recipients, and is also required for use with the Email Gateways.
About FaxPress Enterprise Redundant Line Optimization
Castelle’s Minimum Idle Lines parameter provides a patent-pending way to prioritize incoming fax jobs. The Minimum Idle Lines parameter allows the FaxPress Enterprise Redundant to be configured to always dynamically reserve one or more idle lines for incoming faxes, no matter how many lines are momentarily sending faxes. This minimizes the busy signals delivered, and maximizes the incoming call connect rate.
The reservation of an idle line for receiving faxes is a configurable number, set by default to 0. Changing this value to 1 will keep one line dedicated at all times to incoming calls. Changing the value to a higher number will dedicate more lines for incoming calls, maximizing the incoming call connect rate (see Modifying the Number of Idle Lines.)
With the the number of minimum idle lines set to 1, an 8-line FaxPress Enterprise Redundant will only use a maximum of seven lines at any one time to send faxes, even with all eight lines set to Bi-Directional. An eighth line will always be kept idle, reserved for incoming fax traffic.
With the number of minimum idle lines set to 1, at least two of the Enterprise’s lines (e.g., Line 1 and Line 2) must be configured for the Enterprise to send faxes. Configure the FaxPress Enterprise line connected to the outside line as Bi-Directional, then configure an additional FaxPress Enterprise line as Input Only, rather than Not Connected.
With only one line configured, and with the number of minimum idle lines set to 1, the Enterprise will not send faxes, automatically reserving that line for incoming fax calls. This will be the case even if the one line is configured for Output Only. Keeping the number of idle lines set to the default zero will allow the FaxPress Enterprise Redundant to send faxes with only one line connected and configured.
Modifying the Number of Idle Lines
Modifying the minimum number of idle lines from the default 0 to a value of 1 will enable the system to dynamically mix send and receive jobs while still dedicating a line for incoming fax jobs.
To modify the minimum number of idle lines, follow these steps:
| 1. | Run regedit. Go to Hkey_Local_Machine\Software\Castelle\Eicon Fax Service. |
| 2. | Double-click on the Min Idle Lines key and enter 1 (or a higher value) in the dialog box. Zero is the default value. |
| 3. | Restart the Castelle FaxPress Eicon Fax Board Driver Service (FPEFSrvc). (Start>Settings>Control Panel>Administrative Tools>Services) |
Required FaxPress Enterprise Redundant Configuration
Before beginning the basic configuration, first make sure:
| ■ | the FaxPress Enterprise Redundant is properly connected to your network and phone system, and is powered on. |
| ■ | either the FaxPress Plus Client for Administrators or the FaxPress Plus Client for Users is installed on a network workstation, preferably on the same segment as the Enterprise Redundant. |
After you’re finished with the basic configuration steps described here, make sure you send and receive at least one test fax using the Administrator account (see Sending a Test Fax) to confirm the settings are correct before going on to configuring your Enterprise Redundant for PBX integration/automatic inbound routing (see Automatic Routing and PBX System Integration), or to creating and configuring new Enterprise Redundant users. (See Creating and Configuring User Accounts.)
If your FaxPress Enterprise Redundant is operating in a Novell environment, see User Authentication (Novell Only).
To configure the FaxPress Enterprise Redundant server properties required for the Enterprise Redundant to send and receive faxes, follow these steps:
| 1. | Log onto a network workstation, preferably on the same segment as the Enterprise Redundant. The workstation should already have the FaxPress Plus client installed. You must be logged in with Administrator privileges to configure the FaxPress Enterprise Redundant. If you log in as a user without Administrator privileges, the Server Properties will not be available. |
| 2. | Open FaxPress Plus (Start>Programs>FaxPress>FaxPress Plus). If there are three or fewer FaxPress Enterprise Redundant, FaxPress Premier or FaxPress servers on your network, FaxPress Plus will appear, with the FaxPress Enterprise Redundant Login window requiring you to log in. If there are more than three Castelle fax servers on the network, or if the Enterprise Redundant is on a segment different from the one you’re on, a FaxPress Plus Accounts window will appear, requiring you to select and add the FaxPress Enterprise Redundant server you intend to configure. |
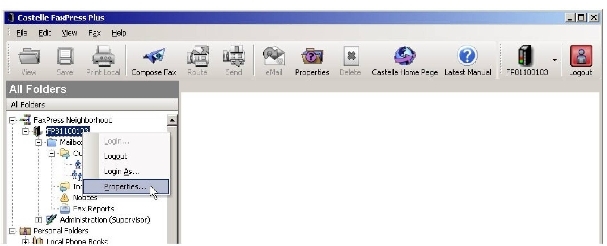
| 3. | If the FaxPress Plus Login window appears, enter the Administrator in the User Name field, and leave the Password field blank, unless you’ve already set an Administrator password. By default, the Administrator password field is blank. You can also log into the FaxPress Enterprise Redundant from FaxPress Plus’s All Folders view, by right-clicking on the serial number or name of the FaxPress Enterprise Redundant from the FaxPress Neighborhood list, and selecting Login as. |
For more detailed information on logging into FaxPress Plus, see FaxPress Plus: An Introduction.
| 4. | If this is the first time you’ve opened FaxPress Plus, you’ll be prompted to activate your Enterprise Redundant software. Select Obtain Key from Web to get your activation key, then enter the key code and click Enable. |
| 5. | Right-click on the FaxPress Enterprise Redundant server and select Properties. |
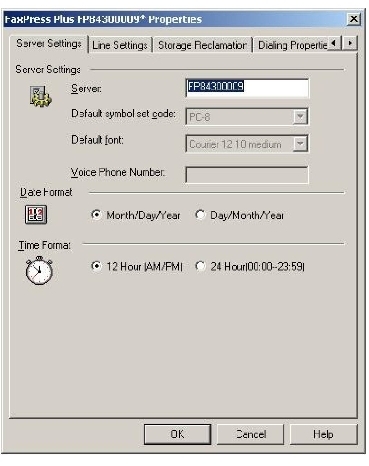
| 7. | Select the Line Settings tab. The Line Settings options provide information the FaxPress needs to communicate with other fax machines. The number of fax channels your Enterprise Redundant has will depend on the model. Each of the Enterprise Redundant’s fax channels is inde-pendent and operates concurrently with the other fax lines. Using the Fax Line pulldown menu, be sure to go through and configure each fax line, whether or not the line is in use. Fax line settings can also be configured through FaxPress Plus’s Fax Lines folder under the Administration branch. |
The Enterprise Redundant’s Fax Line section allows you to:
Use the Fax Line field’s drop-down list to select each fax channel to configure. Configure each fax channel, whether or not the channel is in use. For efficient line utilization in most faxing environments, Castelle recommends setting all lines to Bi-Directional.
Before configuring the FaxPress Enterprise Redundant’s Line Settings, see About FaxPress Enterprise Redundant Line Optimization .

Use the Remote Terminal ID field to provide the line with an identifier by entering a name or number. The Enterprise Redundant uses this information to identify itself to the receiving fax machine during the negotiation phase of the fax transmission. Enter up to 20 characters for this feature.
Use the Imprint Terminal ID field to have your company name or other identifier appear in the header at the top of each successful fax transmission. Enter up to 20 characters.
When enabled and customized, the Enable Customized Imprint feature uses the Remote Terminal ID and Imprint Terminal ID settings displayed here. See Advanced Functions.
The Local Fax Phone Number field does not apply to the Enterprise Redundant.
The Dialing Type section:
Tone and Pulse dialing support do not apply to the Enterprise Redundant.
Use the PBX Pre-dial’s Local, Long Distance and International fields to enter the prefix your PBX system requires for accessing an outside phone line. Up to five digits are allowed. This is not required if the FaxPress Enterprise Redundant is not connected to a PBX system. You’ll only need to enter this information once. The pre-dial code you enter for Line 1 (as an example) will be applied to all lines.
FaxPress automatically inserts a 3 second pause after the PBX pre-dial. This means that you do not have to insert a comma after the PBX digits.
The Line Direction section allows you to select the direction of communication the line will handle.The line direction parameter must be set for each line on the FaxPress Enterprise Redundant server. If a line is not currently being used, as is always the case with the 24th channel of an ISDN line, set this parameter to Disabled.
Select:
Bi-Directional if you want the line to handle incoming and outgoing faxes.
Input Only if you want the line to handle incoming faxes only.
Output Only if you want the line to handle outgoing faxes only.
Disabled if you do not want the line to handle incoming or outgoing faxes. If this channel is not enabled by your service provider, or is a data signaling ("D") channel, as is always the case with the 24th channel of an ISDN line, this channel must be configured as Disabled.
If a channel is not connected as a fax port, and Disabled is not selected, the FaxPress Enterprise Redundant will mistakenly send fax jobs through the channel, generating job failed status entries.
| 8. | Select the Dialing Properties tab. (The Storage Reclamation tab’s settings do not require modification for basic operation. For information regarding the Storage Reclamation settings, see Storage Reclamation .) |
These Dialing Properties settings allow the Enterprise Redundant to be set up to automatically add required dialing prefixes or leave out unnecessary prefixes.
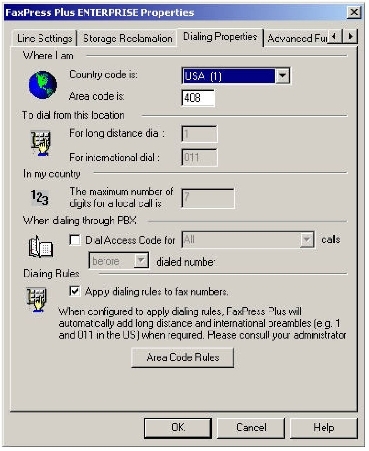
For the Enterprise Redundant to automatically generate complex phone number, you must configure, at minimum:
| ■ | The local country code |
| ■ | The local area code (if any) |
| ■ | The long distance preamble |
| ■ | The international preamble |
| ■ | The number of digits in the local phone number |
| ■ | Whether to insert the PBX password, if there is one, automatically at the beginning or end of the fax telephone number. |
In the Where I am section, select the area code and country code for your area:
Country code is – The ITU assigned country code for each country. For the US this is 1, for UK this is 44 etc. The country code for the FaxPress is set in the Dialing Properties dialog.
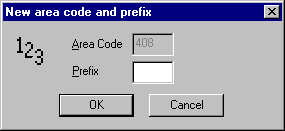
Area code is – The next lower level detail in a phone number. In the US this is a 3 digit number like 408. Some countries like Singapore do not have an area code. In this case, all non-international numbers are local. The area code for the FaxPress is set in the Dialing Properties dialog.
In the To dial from this location section:
For long distance dial – The digit(s) that must be dialed for each long distance call preceding the actual number. In the US, this is 1. This is required for any number dialed whose area code does not match the area code of the FaxPress.
For International dial – The digit(s) that must be dialed for each international call preceding the number. In the US, this is 011. This is required for any number dialed to another country.
In the In my country section:
Enter the maximum number of digits in a local phone number in the The maximum number of digits for a local call is box.
In the US, this is the 7 digit number like 496 0474. A local number is one that does not contain any long distance or international preambles or area codes.
If you are using a PBX system and passwords are required for access to an outside line, in the When dialing through PBX section:
Check Dial Access Code and use the pulldown menu on the right to select whether to insert the password Before or After the number is dialed.
In the Dialing Rules section:
Click Apply dialing rules to fax numbers to activate the dialing rules if any of the following scenarios represent your system:
| ■ | Multiple sources of phone numbers, each with possible a different format of stored numbers. |
| ■ | The wish to avoid repeated dialing of preamble digits, thus keeping the dialing sequence short. |
| ■ | Area code overlays, sometimes requiring the dialing of the complete long distance + area code sequence. |
| ■ | The use of Enterprise Redundant in dialing many different counties, with some countries not having a concept of area codes, some countries having different dialing restrictions etc. |
| ■ | The use of PBX passwords. |
Set the rules for dialing Area codes in the US or Canada by clicking the Area Code Rules button at the bottom of the screen to bring up the Area Code Rules window.
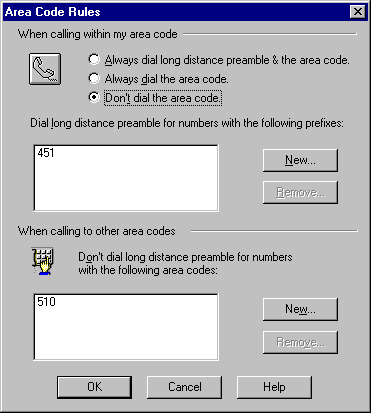
When making local calls in some areas of the US and Canada, the phone company requires the area code or even the long distance preamble plus area code. To specify the requirements for your area, select one:
| ■ | Always dial long distance preamble and area code. |
| ■ | Always dial long distance area code |
| ■ | Don’t dial the area code |
In some cases, this requirement applies only when you are dialing specific exchanges. To specify when this is necessary, click the New button in the Dial long distance preambles with the following prefixes: area.
Likewise, when making long distance phone calls, you may not need to use area codes and long distance preambles for certain area codes. Click New to specify the areas codes that do not require the addition of area code numbers in the box for When calling to other area codes.
When you are finished with your selections, click OK to return to the Dialing Properties window. Click Apply dialing rules to fax numbers to activate the dialing rules you’ve just defined.
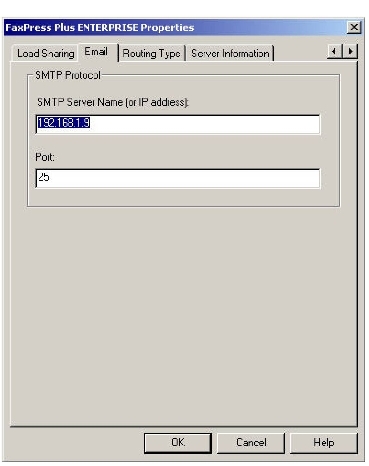
| 9. | Select the Email tab. The Email settings allow the FaxPress Enterprise Redundant to send fax messages to email recipients as well as fax recipients. |
In the SMTP Protocol section:
Use the SMTP Server Name (or IP address) field to enter the name of your company’s SMTP server. Frequently this is an Exchange server name.
Use the Port field to enter the port number your SMTP server communicates through. SMTP servers usually use port 25.
|
FaxPress Enterprise & Enterprise Redundant WebHelp
Last Updated: 11/1/2007
E-mail this page |
Castelle 855 Jarvis Drive, Suite 100 Morgan Hill, CA 95037 Toll-free 800.289.7555 Tel 408.852.8000 Fax 408.852.8100 |